ISA Server 2006
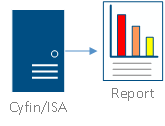
Cyfin is designed to work with ISA Server 2006. Your Cyfin system can be configured in two ways, either as an on-box solution or off-box solution.
Company Overview
Initially introduced in 2000, ISA Server 2000 was the first version of the Internet Security and Acceleration (ISA) Server product. A major revamp was released in 2004 and called ISA Server 2004. This overhaul included significant improvements and put it on par with other firewall and security gateway products. Released in 2006, ISA Server 2006 is Microsoft’s last version of its ISA Server product line and is a comprehensive network security solution that provides a network edge and perimeter firewall, a remote access VPN server, a site-to-site VPN gateway, and Web proxy and caching.
Cyfin - ISA Server 2006 On-Box Configuration

Cyfin is installed directly on ISA Server 2006.
NOTE: For Forefront TMG configurations, click here.
Data Source Setup
Standard Configuration
Log File Type: Microsoft ISA Server (ISA Format)
Default Directory: [InstallPath]\wc\cf\log
Alternate Configuration
Log File Type: Microsoft ISA Server (ISA Extended Format)
Default Directory: [InstallPath]\wc\cf\log
NOTE: Cyfin can be installed directly on the ISA server or on a stand-alone machine. ISA Format uses local time for the data record time stamp. ISA Extended Format uses GMT time (set by the ISA Server and is not configurable).
SQL Database Configuration
NOTE: It is presumed that you have already set up a SQL database and are logging to it from your ISA Server. The steps that follow will not work if you have not set that up first.
If you are successfully logging to a SQL database, please perform the following steps:
- Allow Open Database Connectivity. It is important to set up SQL Server to accept ODBC (Open Database Connectivity). On the machine with SQL Server installed on it, complete these steps:
- Log on to SQL Server Management (Studio).
- Expand the server name.
- Expand the Security folder.
- Right-click the Logins folder and click New Login.
- Enter a new login name (example: wavecrest).
- Select the SQL Server Authentication radio button.
- Type a password (example: wavecrest).
- Uncheck Enforce Password Policy.
- Click the Default db pulldown, and select the database our product will access.
- Click OK to save and exit.
- Create new account for your Wavecrest product to access the SQL Server. You need to set up another account for the product to communicate with your SQL Server database:
- In SQL Server Management (Studio), expand the Databases folder.
- Expand the database that the Wavecrest product will access.
- Expand the Security folder.
- Right-click the Users folder, and click New User.
- Type in the same user and login name (example: wavecrest). *We recommend using the same credentials that you created earlier.
- Select dbo as the Default Schema. Use the browse buttons to find the check box for dbo, select it, and then click OK to save.
- For Database Role Membership (bottom section of the page), select the following check boxes:
- dbdatareader
- dbdatawriter
- Click OK to save and exit.
- Proceed with configuration in your Wavecrest product.
MSDE Database Configuration
NOTE: MSDE-formatted data no longer needs to be extracted to ASCII text files for the product to use. However, if you were using that method (previously required when using MSDE data in past versions of our product), upgrades are backward-compatible, and you do not have to change your processes. You could simply create a new configuration if you want to stop converting MSDE data to text, while still maintaining your older data right where it sits.
For reporting purposes, the product requires the following minor adjustments to read the MSDE database records.
Please perform the following steps on the ISA Server itself:
- Open a DOS prompt and run the vb script msde.vbs. If you have CyBlock ISA installed on your ISA server, you'll need to cd to the following directory (from a C:> prompt) to run it. Below is the full path you should have:
C:>cd program files\wavecrest\cyblock\wc\utils\msde
Once in that directory, simply type msde.vbs and hit ENTER.
NOTE: If your product installation is not on the ISA Server itself, and/or you have the Cyfin product, the msde.vbs script will be in this directory: program files\wavecrest\cyfin\wc\utils\msde. The msde.vbs file must be copied from your product installation to the ISA Server (in a directory path of your choosing) and run in a DOS prompt as described. - Next, from the same DOS prompt run the executable svrnetcn. This executable is a Microsoft creation and is local to your ISA Server. It will simply help you to enable TCP/IP. (It can be run in any directory path).
- Enable TCP/IP. After running the above executable, a GUI popup will appear. Highlight TCP/IP. Click Enable. Click OK. Also click OK through the other couple of prompts you will receive.
- Stop the Microsoft Data Engine service. Open Microsoft ISA Server Management (on the ISA Server itself), highlight the Monitoring node and then select the Services tab. Stop the Microsoft Data Engine service. This will also stop the Microsoft Firewall service.
- Start the Microsoft Data Engine service and Microsoft Firewall service. Now, simply start the two services you just stopped in the previous step.
- Record ISA Server hostname. Take note of the ISA Server's hostname or IP; it is the last thing you will need for configuration.
- Proceed with the configuration.
Configuration Steps
With ISA 2006/2004, information is logged to MSDE database files by default.
NOTE: The steps below are only pertinent to the Standard and Alternate log file configurations mentioned above. If you have other uses for the default MSDE data, the product has the ability to use the MSDE information (see above). The product can also read SQL Server data. A few simple steps are required and described above when you select Microsoft ISA Server (SQL Database) or Microsoft ISA Server (MSDE Database) respectively, as your log file type.
To change Web proxy logging to the standard file type (non-MSDE), here are detailed instructions:
- Open the ISA Server Management console and expand the server name.
- Click the Monitoring node in the left pane of the console.
- On the Monitoring node, click the Logging tab in the middle pane.
- Click the Tasks tab in the right pane.
- Click the Configure Web Proxy Logging link.
- Select log storage format File (do not select "database.")
- In the format drop-down menu, select ISA Server file format.
- Click Apply.
- Click OK.
- To save these changes, click Apply at the top of the middle pane.
NOTE: Now that ISA is logging to the "File" format, it will take some time for a log file to be created. Depending on your volume of Web traffic, you may need to wait several minutes before a log file exists and can be configured in the product.
Configure Integrated Authentication for Outbound Web Requests (optional, recommended)
If you want to provide seamless Internet browsing for your users (e.g., no pop-up requiring a login and password will appear), you should configure Integrated authentication on your ISA Server. To do this, follow these steps:
- Start the ISA Server Management tool.
- Expand ServerName, expand Configuration, and then click Networks.
- Right-click the network that listens for the outbound Web requests, and then click Properties. For example, to configure authentication for users who are connected to the internal network, right-click Internal, and then click Properties.
- Click the Web Proxy tab, and then click the Authentication button.
- Click to select the Basic check box, and then click to select the Integrated check box.
- Click to select the Require all users to authenticate check box.
- Click OK to save the changes and to exit.
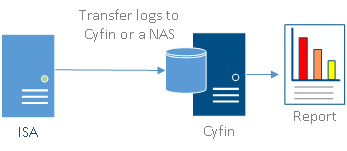
Cyfin - ISA Server 2006 Off-Box Configuration

Cyfin is installed on a server other than ISA Server 2006.
Log File Setup
If Cyfin is installed off-box, the log files need to be transferred to the Cyfin box or put into a suitable location where Cyfin can read them. This can be done in a few ways:
- Copy the log files to the Cyfin machine's local drive (this is what we recommend for best network performance). To automate this process, you can create a script to copy the logs over at a specific time each day.
- FTP the logs over to the Cyfin machine's local drive. Again, this process can also be automated with scripts.
- Have the log files reside on a network drive. NOTE: Cyfin cannot browse the network. For this log file option to be successful, two things must be true:
- The network drive must be mounted on the network.
- The Cyfin Service logon account needs to be a domain account with administrative rights.
Please see the section above for information about data source setups, keeping in mind that the directory path for log files will be different for an off-box solution.
-Allen Lochamy, Atlanta Bonded Warehouse


